About 2 years ago I started dyeing yarn. When I started, I had no idea what I was doing. It was an experiment. Now, through trial and error, I have developed the way I usually dye yarn. There are tons on different ways to hand dye. To me, there is no real right way to do it. You can experiment with what works best for you until you reach your desired results.
I dye with both permanent acid dyes and also food coloring. Both are fun.
Today I am dip dyeing Nudis Sock with Wilton Delphinium Blue. Dip dyeing is one of my favorite methods. You get lusciously dark dye on one side and then very light colored on the other end of the skein. When I dip dye, I do not presoak my yarn. I just prefer to do it with dry yarn because I think it yields more dramatic results.
I am using 2 skeins of Nudis Sock. This yarn is 80% Superwash Merino Wool & 20% Nylon. Each skein is 50 grams and is about 191 yards long. I am going to dye each skein in the same way so that I end up with 2 skeins that look the same in the end.


I dye with both permanent acid dyes and also food coloring. Both are fun.
Today I am dip dyeing Nudis Sock with Wilton Delphinium Blue. Dip dyeing is one of my favorite methods. You get lusciously dark dye on one side and then very light colored on the other end of the skein. When I dip dye, I do not presoak my yarn. I just prefer to do it with dry yarn because I think it yields more dramatic results.
Materials needed:
• 2 skeins of Nudis Sock yarn
• Wilton Delphinium Blue food coloring
• Plastic knife or spoon
• White vinegar
• Pot and strainer that will only be used for yarn dyeing (not food)
• Dawn Dish Detergent
I am using 2 skeins of Nudis Sock. This yarn is 80% Superwash Merino Wool & 20% Nylon. Each skein is 50 grams and is about 191 yards long. I am going to dye each skein in the same way so that I end up with 2 skeins that look the same in the end.

Start with a pot filled with 8 cups of water and 1/4 cup white vinegar. Use a pot that will only be used for dyeing yarn and not for cooking food. I bought mine at Target. It is just like this one and came with a steamer basket too and I use that part for hand painted yarns (tutorials for that to come). Heat the water on high until just before it boils.

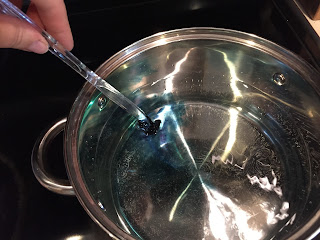
Today I am using Wilton Delphinium Blue for my dye.

I scooped out a good amount onto a plastic knife. I'd say about 1.5 teaspoons.

Then swirl the knife into the hot water until all of the dye gets mixed into the water.


Now we will start to dip dye. I held the two open skeins by the tops and slowly started to dip them into the dye pot.

Dip in a slow up and down motion.

And each time you dip, dip a little bit more yarn into the dye pot.

Keep going until almost the entire skein is dipped.

Once you have almost dipped the entire skein, just go ahead and put the whole skein into the pot.


Put a lid on your pot. Turn the heat down so that it is at a low simmer. And simmer for 30 minutes.

At the end of the 30 minutes, the yarn should have absorbed all of the dye and the water in your pot should have no color or almost no color at all. If there is still color in your water, add about 1/4 cup more white vinegar and let it simmer for another 30 minutes. If you water has no color, turn the heat off and remove the lid.

You can let the yarn fully cool in your pot and or you can dump it into a strainer over your sink (use a strainer that will only be used for dyeing and not food).

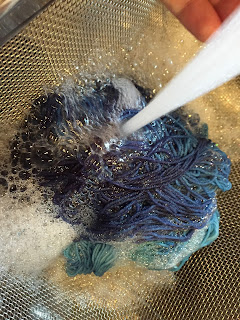
Run hot water over the yarn.

Rub a little bit of Dawn in your hands and then put your hands under the water so that the Dawn gently rinses onto your yarn.

Rinse the yarn until all of the soap is gone. Then gently ring out the yarn.

You can see the pretty color gradients in the above picture from dip dyeing.
Then I let my yarn air dry on a clothes drying rack.

This is the top portion of the skein- the part that I put in the dye pot last.

This is the middle portion of the skein.

This is the bottom portion of the skein- the part that went in the dye pot first.

After the skeins are dried, this is what they looked like. I love how they turned out and can't wait to use them. I am going to use the yarn to make mittens :)

Skein and Hook Copyright © 2014
The pattern and photographs contained in this document are the property of Skein and Hook. This pattern is available for personal use only. This pattern may be printed for your personal use only. You may not in any form copy, redistribute, sell, or represent this pattern or photos as your own.
Please do not copy this post and claim it as your own. Please do not republish photos from this post and claim them as your own.
You are welcomed to sell the items that you make from this pattern- please just credit me as the designer with a link to this post.
Comments
Post a Comment