I designed this pouch with a change purse in mind. I was thinking about how my daughter will be going to first grade next school year and she will need a change purse to keep with her for buying lunch, etc... It is sized to hold dollar bills that are folded in half and change. That being said, there are many things you could use this little pouch for besides money.
Ive done this pouch in lots of different variations- all solid, 3 colors (using the pattern: color 1, color 2, color 3, color 2, color 1), and in five colors- sometimes ombre and sometimes using 5 colors the look nice together. The possibilities are endless :)
Here is an ombre-ish example:

Here is the one shown in this tutorial:

Materials needed- for the crochet pouch:
Materials needed- for the fabric lining & zipper (if desired):
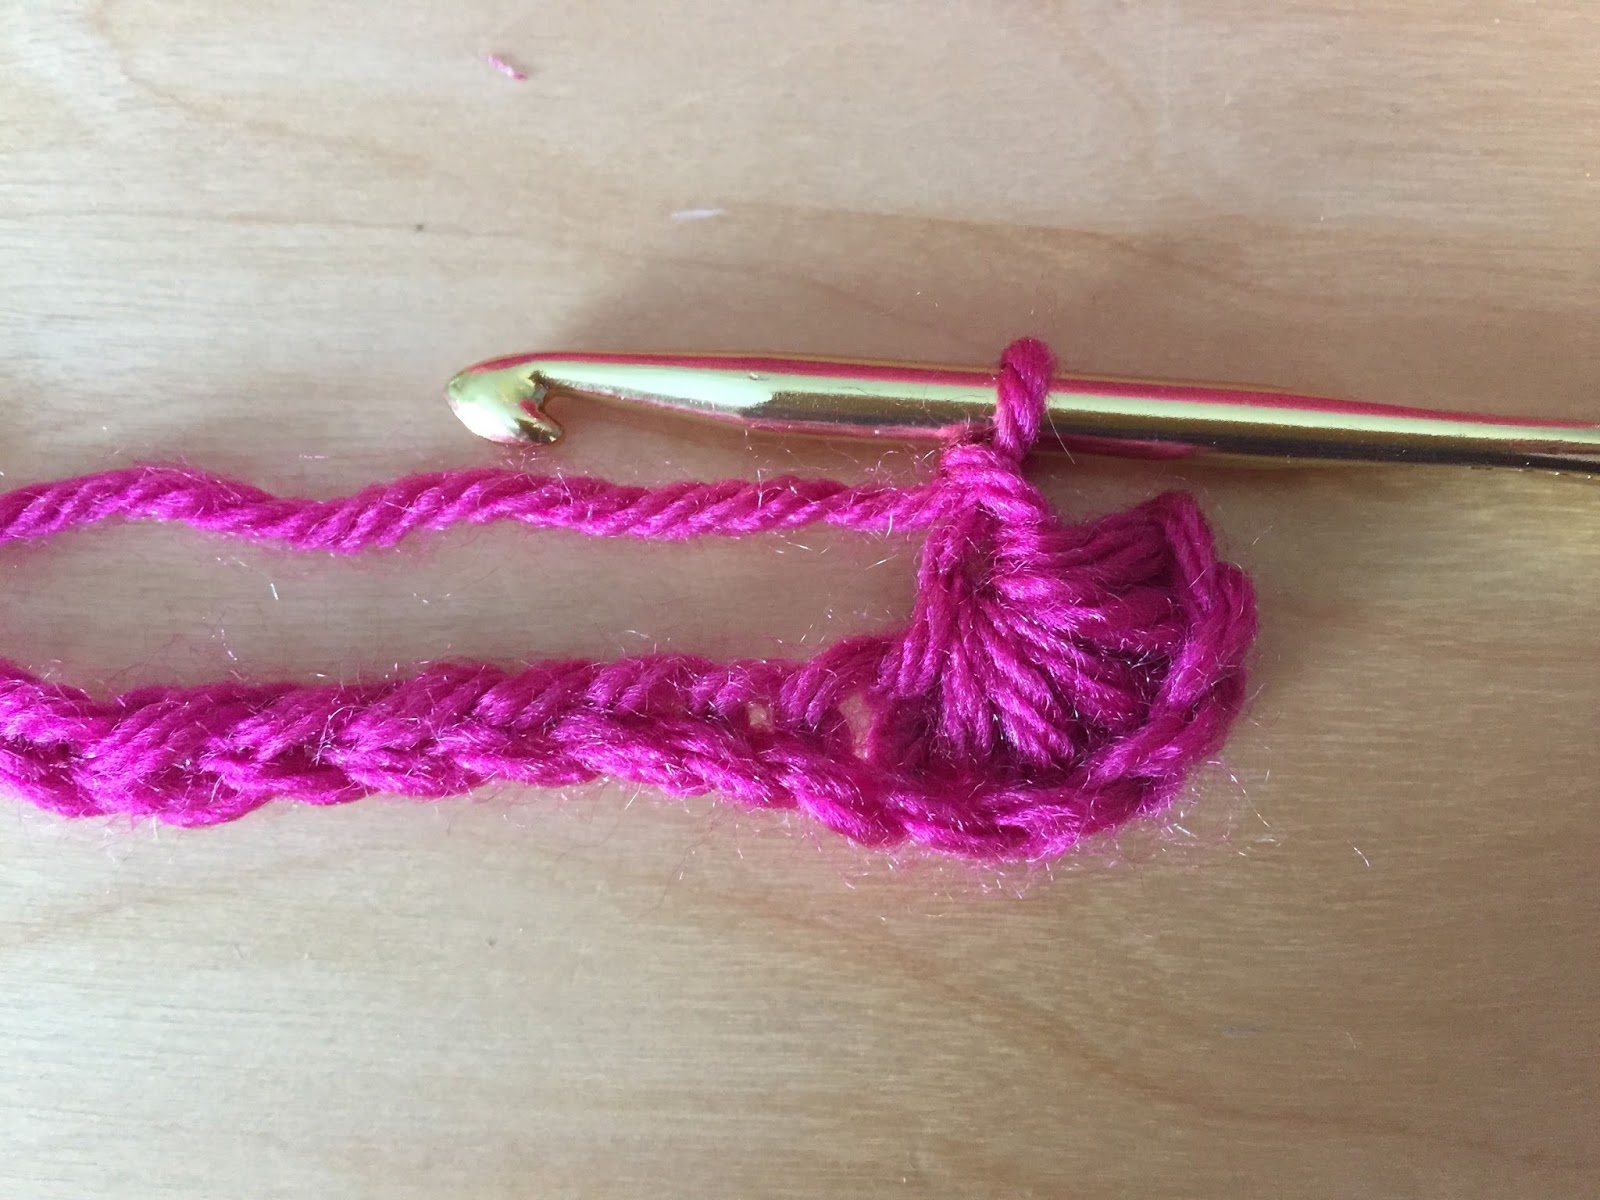
Ch 22

Row 1: Working in the BLO, pick up a loop in 2nd ch and in each of next 4 ch (6 loops on hook),

yo and through all loops on hook,

ch 1 (this forms eye of star),

*pick up a loop in the eye of last star (green arrow), pick up a loop through the back of last loop of previous star (yellow arrow), pick up a loop through same ch as last loop of previous star (red arrow), pick up a loop in each of next 2 ch (blue arrow and then white arrow) (6 loops on hook),

yo and through all 6 loops, ch 1,


rep from * across,

after 9 stars, you will begin working the FLO, which when you turn your work around to continue working becomes the BLO. You will continue working as the pattern states above. This star stitch will turn the corner for you so that you can continue working around the other side of the chain. As pictured below, you will pick up a loop in the eye of last star (green arrow), pick up a loop through the back of last loop of previous star (yellow arrow), pick up a loop through same ch as last loop of previous star (red arrow), pick up a loop in each of next 2 ch (blue arrow and then white arrow) (6 loops on hook),

yo and through all 6 loops, ch 1. Now you will be working on the remaining chain loops, opposite the side that you were working before.

Join in 1st star stitch with sl st. You will have made 18 stars total.

Row 2: Ch 1, *1 sc in the same as the join (top of star), 1 sc in eye of the same star st*, repeat from * to * across (36sc) , join to beginning ch 1 with sl st. See image below- the arrows show you the places that you will sc.

Row 3: Join new color, loosely ch 2,

pick up back loop of 2nd ch from hook, then pick up the front loop of the same ch,

pick up loop in each of next 3 sc,

yo and through all 6 loops,
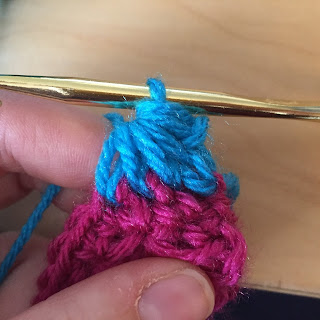
ch 1,

*pick up a loop in eye of last star, pick up loop in back of last loop of star, pick up loop in same sc as last loop of star, pick up a loop in each of next 2 sc, yo and through all 6 loops, ch 1, rep from * across. (The last loop that you pull up for the last star will be in the joining stitch from the previous round.) Join in 1st star stitch with sl st. You will have made 18 stars total.
Row 4: Ch 1, *1 sc in the same as the join (top of star), 1 sc in eye of the same star st*, repeat from * to * across (36sc) , join to beginning ch 1 with sl st.

Row 5: Join new color, loosely ch 2, pick up back loop of 2nd ch from hook, then pick up the front loop of the same ch, pick up loop in each of next 3 sc, yo and through all 6 loops, ch 1, *pick up a loop in eye of last star, pick up loop in back of last loop of star, pick up loop in same sc as last loop of star, pick up a loop in each of next 2 sc, yo and through all 6 loops, ch 1, rep from * across. (The last loop that you pull up for the last star will be in the joining stitch from the previous round.) Join in 1st star stitch with sl st. You will have made 18 stars total.
Row 6: Ch 1, *1 sc in the same as the join (top of star), 1 sc in eye of the same star st*, repeat from * to * across (36sc) , join to beginning ch 1 with sl st.

Row 7: Join new color, loosely ch 2, pick up back loop of 2nd ch from hook, then pick up the front loop of the same ch, pick up loop in each of next 3 sc, yo and through all 6 loops, ch 1, *pick up a loop in eye of last star, pick up loop in back of last loop of star, pick up loop in same sc as last loop of star, pick up a loop in each of next 2 sc, yo and through all 6 loops, ch 1, rep from * across. (The last loop that you pull up for the last star will be in the joining stitch from the previous round.) Join in 1st star stitch with sl st. You will have made 18 stars total.
Row 8: Ch 1, *1 sc in the same as the join (top of star), 1 sc in eye of the same star st*, repeat from * to * across (36sc) , join to beginning ch 1 with sl st.

Row 9: Join new color, loosely ch 2, pick up back loop of 2nd ch from hook, then pick up the front loop of the same ch, pick up loop in each of next 3 sc, yo and through all 6 loops, ch 1, *pick up a loop in eye of last star, pick up loop in back of last loop of star, pick up loop in same sc as last loop of star, pick up a loop in each of next 2 sc, yo and through all 6 loops, ch 1, rep from * across. (The last loop that you pull up for the last star will be in the joining stitch from the previous round.) Join in 1st star stitch with sl st. You will have made 18 stars total.
Row 10: Ch 1, *1 sc in the same as the join (top of star), 1 sc in eye of the same star st*, repeat from * to * across (36sc) , join to beginning ch 1 with sl st.

Row 11: Sl st in each stitch around, finish off with an invisible join.

To add a fabric lining and zipper to this pouch, please see my tutorial here.


Ive done this pouch in lots of different variations- all solid, 3 colors (using the pattern: color 1, color 2, color 3, color 2, color 1), and in five colors- sometimes ombre and sometimes using 5 colors the look nice together. The possibilities are endless :)
Here is an ombre-ish example:

Here is the one shown in this tutorial:

Materials needed- for the crochet pouch:
• U.S. H- 5.00 MM crochet hook
• Worsted weight yarn- used here: Vanna's Choice
•
Materials needed- for the fabric lining & zipper (if desired):
• 5" zipper
• Fabric- 2 pieces that are roughly 5" high by 6"wide
•Needle & thread
•Sewing machine (optional)
•a few ball head straight pins
•Sewing machine (optional)
•a few ball head straight pins
Abbreviations:
• ch= chain
• sc= single crochet
• BLO= back loop only
• FLO= front loop only
• FLO= front loop only
• sl st= slip stitch
Finished size:
• 4" high by 5" wide
Pouch:
Ch 22

Row 1: Working in the BLO, pick up a loop in 2nd ch and in each of next 4 ch (6 loops on hook),

yo and through all loops on hook,

ch 1 (this forms eye of star),
*pick up a loop in the eye of last star (green arrow), pick up a loop through the back of last loop of previous star (yellow arrow), pick up a loop through same ch as last loop of previous star (red arrow), pick up a loop in each of next 2 ch (blue arrow and then white arrow) (6 loops on hook),

yo and through all 6 loops, ch 1,


rep from * across,

after 9 stars, you will begin working the FLO, which when you turn your work around to continue working becomes the BLO. You will continue working as the pattern states above. This star stitch will turn the corner for you so that you can continue working around the other side of the chain. As pictured below, you will pick up a loop in the eye of last star (green arrow), pick up a loop through the back of last loop of previous star (yellow arrow), pick up a loop through same ch as last loop of previous star (red arrow), pick up a loop in each of next 2 ch (blue arrow and then white arrow) (6 loops on hook),

yo and through all 6 loops, ch 1. Now you will be working on the remaining chain loops, opposite the side that you were working before.

Join in 1st star stitch with sl st. You will have made 18 stars total.

Row 2: Ch 1, *1 sc in the same as the join (top of star), 1 sc in eye of the same star st*, repeat from * to * across (36sc) , join to beginning ch 1 with sl st. See image below- the arrows show you the places that you will sc.

Row 3: Join new color, loosely ch 2,

pick up back loop of 2nd ch from hook, then pick up the front loop of the same ch,

pick up loop in each of next 3 sc,

yo and through all 6 loops,

ch 1,

*pick up a loop in eye of last star, pick up loop in back of last loop of star, pick up loop in same sc as last loop of star, pick up a loop in each of next 2 sc, yo and through all 6 loops, ch 1, rep from * across. (The last loop that you pull up for the last star will be in the joining stitch from the previous round.) Join in 1st star stitch with sl st. You will have made 18 stars total.
Row 4: Ch 1, *1 sc in the same as the join (top of star), 1 sc in eye of the same star st*, repeat from * to * across (36sc) , join to beginning ch 1 with sl st.

Row 5: Join new color, loosely ch 2, pick up back loop of 2nd ch from hook, then pick up the front loop of the same ch, pick up loop in each of next 3 sc, yo and through all 6 loops, ch 1, *pick up a loop in eye of last star, pick up loop in back of last loop of star, pick up loop in same sc as last loop of star, pick up a loop in each of next 2 sc, yo and through all 6 loops, ch 1, rep from * across. (The last loop that you pull up for the last star will be in the joining stitch from the previous round.) Join in 1st star stitch with sl st. You will have made 18 stars total.
Row 6: Ch 1, *1 sc in the same as the join (top of star), 1 sc in eye of the same star st*, repeat from * to * across (36sc) , join to beginning ch 1 with sl st.

Row 7: Join new color, loosely ch 2, pick up back loop of 2nd ch from hook, then pick up the front loop of the same ch, pick up loop in each of next 3 sc, yo and through all 6 loops, ch 1, *pick up a loop in eye of last star, pick up loop in back of last loop of star, pick up loop in same sc as last loop of star, pick up a loop in each of next 2 sc, yo and through all 6 loops, ch 1, rep from * across. (The last loop that you pull up for the last star will be in the joining stitch from the previous round.) Join in 1st star stitch with sl st. You will have made 18 stars total.
Row 8: Ch 1, *1 sc in the same as the join (top of star), 1 sc in eye of the same star st*, repeat from * to * across (36sc) , join to beginning ch 1 with sl st.

Row 9: Join new color, loosely ch 2, pick up back loop of 2nd ch from hook, then pick up the front loop of the same ch, pick up loop in each of next 3 sc, yo and through all 6 loops, ch 1, *pick up a loop in eye of last star, pick up loop in back of last loop of star, pick up loop in same sc as last loop of star, pick up a loop in each of next 2 sc, yo and through all 6 loops, ch 1, rep from * across. (The last loop that you pull up for the last star will be in the joining stitch from the previous round.) Join in 1st star stitch with sl st. You will have made 18 stars total.
Row 10: Ch 1, *1 sc in the same as the join (top of star), 1 sc in eye of the same star st*, repeat from * to * across (36sc) , join to beginning ch 1 with sl st.

Row 11: Sl st in each stitch around, finish off with an invisible join.

To add a fabric lining and zipper to this pouch, please see my tutorial here.


Skein and Hook Copyright © 2014
The pattern and photographs contained in this document are the property of Skein and Hook. This pattern is available for personal use only. This pattern may be printed for your personal use only. You may not in any form copy, redistribute, sell, or represent this pattern or photos as your own.
Please do not copy this post and claim it as your own. Please do not republish photos from this post and claim them as your own.
You are welcomed to sell the items that you make from this pattern- please just credit me as the designer with a link to this post.
I just made a purse for glasses with the same stitch, but I was told to make it all in one peace, and the joining point of the circle came out not nice. I asked if it is possible to crochet in one piece, and they said that it is possible, but I suspected there will be a problem. Now when I saw your work, I see you made from 2 parts and joined them together, as I wanted to do at first!
ReplyDeleteHi,
DeleteThis change purse is made in the round, not in two separate pieces that are joined together. Thanks!
Buenisimo!!!!...a tejer se ha dicho 😍
ReplyDeleteMe encanto,buenisimo!!!!!....a tejer se ha dicho 😍
ReplyDeleteMe encanto,buenisimo!!!!!....a tejer se ha dicho 😍
ReplyDeleteWow... I was going to make a change purse, bt didn't hv a pattern.... Now I got one... Thank u... Its amazing.. I love it... Is it possible to post here our created things inspired by u... If so please tell... Wen I will make mine purse, I want to show u ;)
ReplyDeleteHi! I'm so glad you like my pattern for the change purse! I'd love to see the one you make! If you're on Instagram, just tag me @skeinandhook and tag your project with #skeinandhook. Otherwise you could post it to my Facebook page or even email me!
Delete