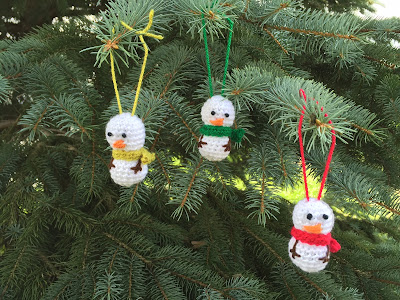
Christmas in July has become Christmas in August :) July got pretty busy over here so I am just getting around to sharing this Christmas ornament pattern (I actually have one more ornament pattern and a garland that are almost ready to share as well that I intended to post in July as well). In any event, I love this little snowman and hope you do too!
Materials needed:
• 3.50 MM crochet hook
• Stylecraft Special DK- White for the body, Spice for the nose, Green for scarf (also, pictured above Lime and Lipstick), Dark Brown or Walnut for arms, Black for eyes
• Poly-fil
• Tapestry needle for sewing in the ends
Gauge:
• Gauge isn't too important here. You can make this snowman with any size yarn and hook, your finished size will just be different.
Abbreviations:
• ch= chain
• sc= single crochet
• dc= double crochet
• sc2tog= single crochet 2 together
• MR= magic ring
• sl st= slip stitch
Finished size:
• Top of the the head to the bottom of the body= 2 1/4"
Body:
NOTE: You will work in the round for this whole snowman, do not join at all.
1: MR, ch 2, 6 sc in the ring, pull tight- 6
2: 2sc in each- 12
3: (2sc, sc) around- 18
4-6: Sc around- 18
7: (Sc2tog, sc)around- 12
Now you will add french knots for eyes. I cut about a 4.5" length of black yarn. Then added mine at row 5. I added the first eye, then counted over 2 sc then added the next eye. I tucked the ends into the head instead of cutting them.
Next, add the carrot nose. I cut a 9" length of Spice yarn. I started under the right eye and continued on a downward slant and then kept going back and forth until I had a full, carrot-shaped nose.
8: Sc2tog around- 6
9: 2 sc in each around- 12
10: (2 sc, sc) around- 18
Now stuff the head with Poly-fil
11-14: Sc around- 18
Now sew in the arms. I cut a 9" length of brown yarn. I began at round 9 on the side of the body and went down to round 13. Then I made the hands by starting at the arm line and going out to one side, then going back to the arm line and going out to the other side. Repeat on the other side of the body for the other arm.
15: (Sc2tog, sc) around- 12
Stuff the body with Poly-fil
16: Sc2tog around- 6
Bind off and use needle to sew the hole shut. Weave in ends.
Scarf:
NOTE: You will work back and forth for the scarf, NOT in rounds.
1: Leave a 4" tail, ch 23, sc in the 2nd from hook and each across- 22. Weave in the end you just took off your hook. Leave the beginning 4" tail, you will use this to secure the scarf to the snowman.
Wrap the scarf around the snowman's neck with the ends of it overlapping on one of the sides. Use the tail and go in and out of the snowman to secure the scarf into place then weave the tail end into the scarf.
Add string to hang the ornament. I cut an 8" length of yarn in the same color as the scarf.
Skein and Hook Copyright © 2014
The pattern and photographs contained in this document are the property of Skein and Hook. This pattern is available for personal use only. This pattern may be printed for your personal use only. You may not in any form copy, redistribute, sell, or represent this pattern or photos as your own.
Please do not copy this post and claim it as your own. Please do not republish photos from this post and claim them as your own.
You are welcomed to sell the items that you make from this pattern- please just credit me as the designer with a link to this post.


Comments
Post a Comment