I made these adorable Valentine's headbands for my daughters. For three free crochet headband patterns and how I made them, see below!

I saw the cutest heart headband floating around Pinterest and decided to make one for each of my daughters. The tutorial for the heart headband is here and the original heart pattern is here.
But instead of using an elastic headband, I decided to use a crochet one. I made some of these last year for my girls to wear at Easter and they turned out well so I was excited to make more.
Here are my hearts:

For the red one, I used Vanna's Choice yarn in Scarlet with a K hook. For the darker pink, I used Red Heart Soft Baby Steps in Strawberry with an I hook. For the lighter pink, I used Vanna's Choice yarn in Pink with a G hook.
All of the headbands begin the same way. If you are using 2 hair ties you have to join them together before you start joining the yarn onto the hair tie. If you are using one hair tie, you can begin to join the yarn onto the hair tie right away.
To join the hair ties together,


Free Pattern: Crochet Headband #1

Materials:
-Lily Sugar 'n Cream in White
-G hook
-1 or 2 ouch-free rubber band elastic hair ties, depending on how big you want it
Stitches Used:
ch- chain
sl st- slip stitch
sc- single crochet
3dc cluster-
1: Join onto the hair tie with a sl st (Image 1), then make 4 sc around the hair tie, ch 3, turn (Image 2), 3dc cluster in the 4th stitch from hook (which is the 1st sc on the hair tie in this direction), ch 1, dc in the next stitch (Image 3), ch 2, skip 2 stitches, dc in the next stitch (with is the sl st join from the beginning), ch 2, dc in the same st as last dc (Image 4).


2: Ch 3, turn, 3dc cluster in the ch 2 sp of the row below, ch 1, dc in the next stitch, ch 2, skip 2 stitches, dc in the next, ch 2, dc in the same as the last.
Repeat row 2 until desired length. For a 21.5" head, I continued until the crocheted piece measured 14".

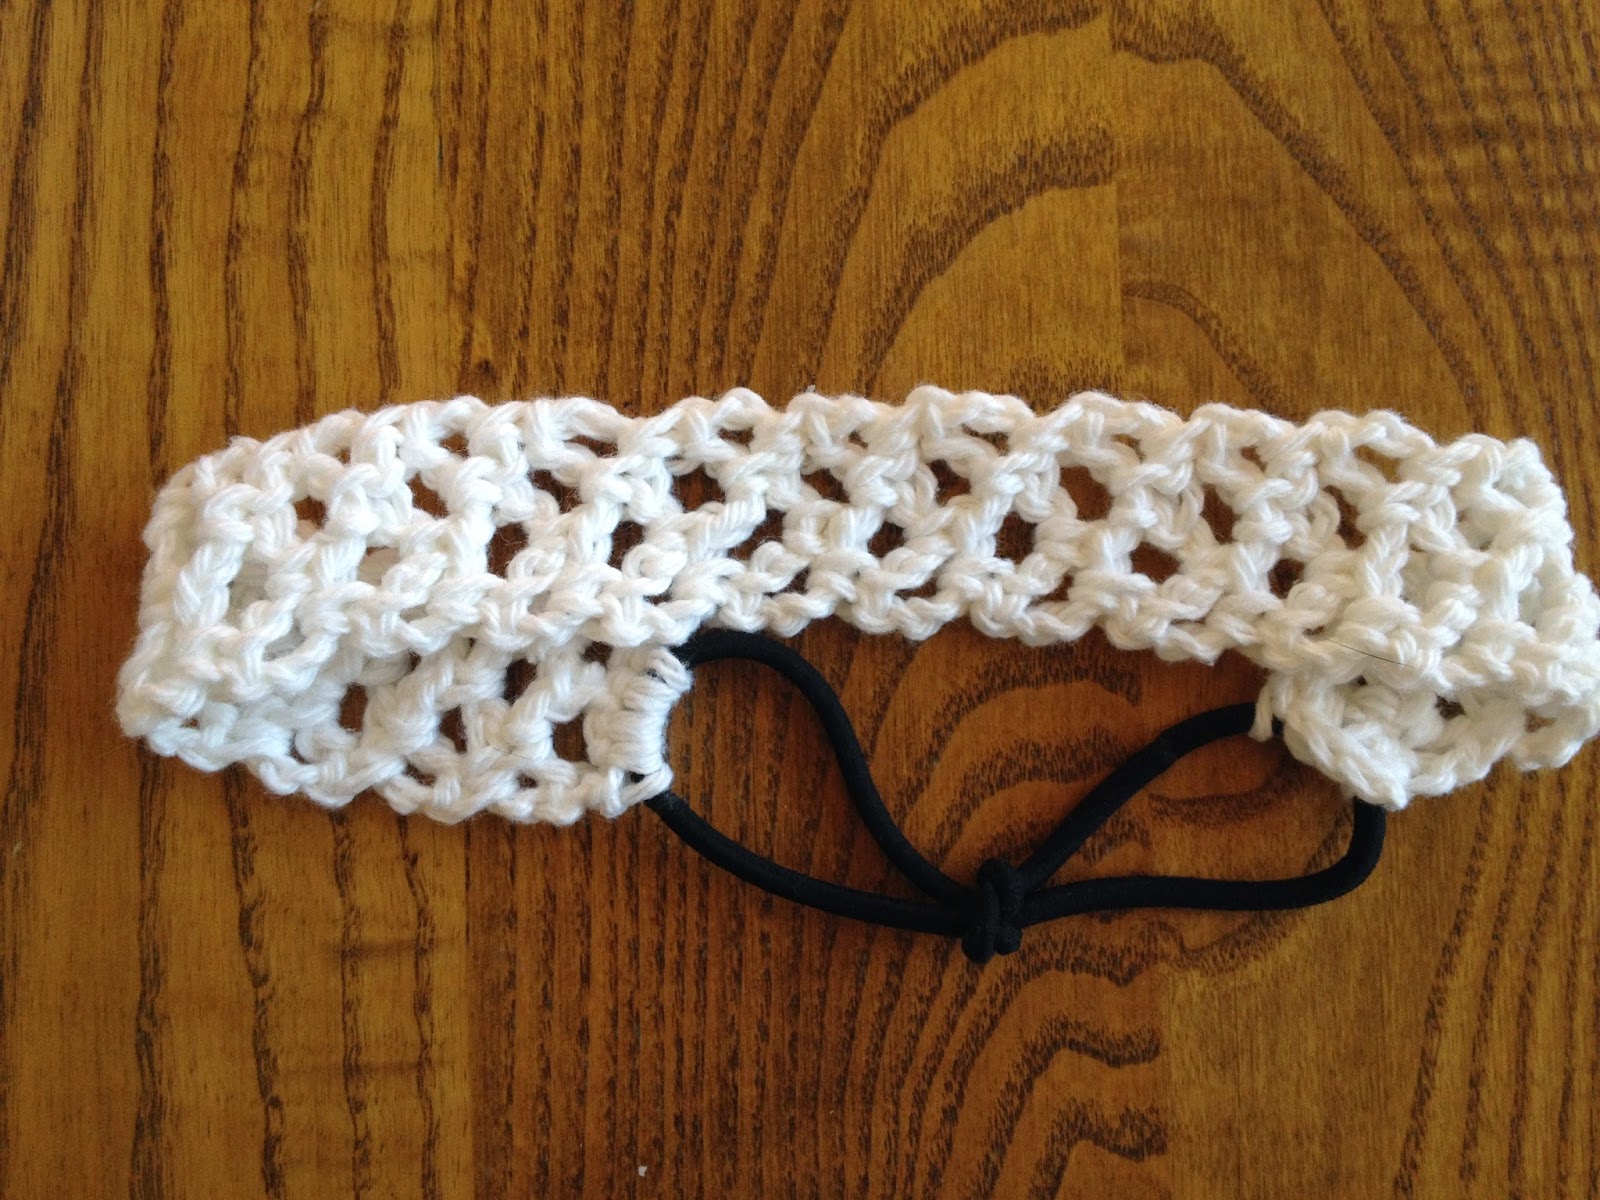
Ch 1, turn, sl st around the hair tie (Image 5), then sc around the hair tie and in the ch 2 sp of row below, sc around hair tie and in dc of row below, sc around the hair tie and in the ch 2 sp of row below, sc around hair tie and in dc of row below, sc around hair tie and in the top of the 3dc cluster of the row below. Bind off and weave in both ends (Image 6).


Free Pattern: Crochet Headband #2
Materials:
-Lily Sugar 'n Cream in White
-G hook
-1 or 2 ouch-free rubber band elastic hair ties, depending on how big you want it
Stitches Used:
ch- chain
sl st- slip stitch
sc- single crochet
3dc cluster-
1: Join onto the hair tie with a sl st, then make 4 sc around the hair tie, ch 3, turn, sc in the 5th stitch from hook (which is the 2nd sc on the hair tie in this direction), ch3, sc in last on rubber band.

2: Ch3, turn, sc in ch 3 space, ch 3, sc in ch 3 space.

Repeat row 2 until desired length. For a 20" head, I continued until the crocheted piece measured 12".

Ch 1, turn, sl st around hair tie, sc around hair tie and in ch 3 sp, sc around hair tie an in sc, sc around hair tie and in ch 3 sp. Bind off and weave in both ends.
Free Pattern: Crochet Headband #3

Materials:
-Lily Sugar 'n Cream in White
-G hook
-1 or 2 ouch-free rubber band elastic hair ties, depending on how big you want it
Stitches Used:
ch- chain
sl st- slip stitch
sc- single crochet
3dc cluster-
1: Join onto the hair tie with a sl st, then make 3 sc around the hair tie, ch 3, turn, (dc, ch 1, dc) in the 5th stitch from hook (which is the 2nd sc on the hair tie in this direction), skip 1 stitch, dc in the last stitch.
2: Ch 2, turn, (dc, ch 1, dc) in the ch 1 sp of the row below, dc in the top ch of the ch 3 from the row below.
Repeat row 2 until desired length. For a 13" head circumference, I continued until the crocheted piece measured 9.5".

Ch 1, turn, sl st around the hair tie, then sc around the hair tie and in the ch 2 sp of row below, sc around hair tie and in dc of row below, sc around the hair tie and in the ch 2 sp of row below, sc around hair tie and in dc of row below, sc around hair tie and in the top of the 3dc cluster of the row below. Bind off and weave in both ends.
After I made the hearts and the headbands, I hot glued the hearts to the headbands. You could also stitch the hearts onto the headbands with yarn or thread. Can't wait for my kids to wear them!
I saw the cutest heart headband floating around Pinterest and decided to make one for each of my daughters. The tutorial for the heart headband is here and the original heart pattern is here.
But instead of using an elastic headband, I decided to use a crochet one. I made some of these last year for my girls to wear at Easter and they turned out well so I was excited to make more.
Here are my hearts:
For the red one, I used Vanna's Choice yarn in Scarlet with a K hook. For the darker pink, I used Red Heart Soft Baby Steps in Strawberry with an I hook. For the lighter pink, I used Vanna's Choice yarn in Pink with a G hook.
All of the headbands begin the same way. If you are using 2 hair ties you have to join them together before you start joining the yarn onto the hair tie. If you are using one hair tie, you can begin to join the yarn onto the hair tie right away.
To join the hair ties together,
Cross one hair tie over the other.
Fold one side of one of the hair ties under the back and pull it through.
It will look like this.
Then pull each end tight and it will look like the above.
Materials:
-Lily Sugar 'n Cream in White
-G hook
-1 or 2 ouch-free rubber band elastic hair ties, depending on how big you want it
Stitches Used:
ch- chain
sl st- slip stitch
sc- single crochet
3dc cluster-
1: Join onto the hair tie with a sl st (Image 1), then make 4 sc around the hair tie, ch 3, turn (Image 2), 3dc cluster in the 4th stitch from hook (which is the 1st sc on the hair tie in this direction), ch 1, dc in the next stitch (Image 3), ch 2, skip 2 stitches, dc in the next stitch (with is the sl st join from the beginning), ch 2, dc in the same st as last dc (Image 4).
Image 1
Image 2
Image 3
Image 4
Repeat row 2 until desired length. For a 21.5" head, I continued until the crocheted piece measured 14".
Ch 1, turn, sl st around the hair tie (Image 5), then sc around the hair tie and in the ch 2 sp of row below, sc around hair tie and in dc of row below, sc around the hair tie and in the ch 2 sp of row below, sc around hair tie and in dc of row below, sc around hair tie and in the top of the 3dc cluster of the row below. Bind off and weave in both ends (Image 6).
Image 5
Image 6
Free Pattern: Crochet Headband #2
Materials:
-Lily Sugar 'n Cream in White
-G hook
-1 or 2 ouch-free rubber band elastic hair ties, depending on how big you want it
Stitches Used:
ch- chain
sl st- slip stitch
sc- single crochet
3dc cluster-
1: Join onto the hair tie with a sl st, then make 4 sc around the hair tie, ch 3, turn, sc in the 5th stitch from hook (which is the 2nd sc on the hair tie in this direction), ch3, sc in last on rubber band.
2: Ch3, turn, sc in ch 3 space, ch 3, sc in ch 3 space.
Repeat row 2 until desired length. For a 20" head, I continued until the crocheted piece measured 12".
Ch 1, turn, sl st around hair tie, sc around hair tie and in ch 3 sp, sc around hair tie an in sc, sc around hair tie and in ch 3 sp. Bind off and weave in both ends.
Free Pattern: Crochet Headband #3
Materials:
-Lily Sugar 'n Cream in White
-G hook
-1 or 2 ouch-free rubber band elastic hair ties, depending on how big you want it
Stitches Used:
ch- chain
sl st- slip stitch
sc- single crochet
3dc cluster-
1: Join onto the hair tie with a sl st, then make 3 sc around the hair tie, ch 3, turn, (dc, ch 1, dc) in the 5th stitch from hook (which is the 2nd sc on the hair tie in this direction), skip 1 stitch, dc in the last stitch.
2: Ch 2, turn, (dc, ch 1, dc) in the ch 1 sp of the row below, dc in the top ch of the ch 3 from the row below.
Repeat row 2 until desired length. For a 13" head circumference, I continued until the crocheted piece measured 9.5".
Ch 1, turn, sl st around the hair tie, then sc around the hair tie and in the ch 2 sp of row below, sc around hair tie and in dc of row below, sc around the hair tie and in the ch 2 sp of row below, sc around hair tie and in dc of row below, sc around hair tie and in the top of the 3dc cluster of the row below. Bind off and weave in both ends.
After I made the hearts and the headbands, I hot glued the hearts to the headbands. You could also stitch the hearts onto the headbands with yarn or thread. Can't wait for my kids to wear them!
Skein and Hook Copyright © 2015
The pattern and photographs contained in this document are the property of Skein and Hook. This pattern is available for personal use only. This pattern may be printed for your personal use only. You may not in any form copy, redistribute, sell, or represent this pattern or photos as your own.
Please do not copy this post and claim it as your own. Please do not republish photos from this post and claim them as your own.
You are welcomed to sell the items that you make from this pattern- please just credit me as the designer with a link to this post.
In the top headband you have in step 2 as "2: Ch 3, turn, 3dc cluster in the ch 2 sp of the row below, ch 1, dc in the next stitch, ch 2, skip 2 stitches, dc in the next, ch 2, dc in the same as the last" When I tried to follow as you have it written it looks nothing like yours. From what I can see of you picture when you CH 2 you didn't SK2 you DC in the same as the last DC. This created a V for the 3DC cluster in the next row. If you will please look and see if this is correct. I like that the pattern isn't written in short hand instructions, but it got me confused at that point.
ReplyDeleteHi Jeniffer,
ReplyDeleteStep 2 as written is correct. I do see where you are getting confused though. I'll try to explain it here for you- 2: Ch 3, turn, 3dc cluster in the ch 2 sp of the row below {this space is the one that you make when you (dc, ch2, dc) in the row below}, ch 1, dc in the next stitch, ch 2, skip 2 stitches {the 2 stitches that you are skipping will be the ch 2 from the row below; this creates that chain spacing in the middle of the headband}, dc in the next {which will be the dc of the row below}, ch 2, dc in the same as the last {this is where you are creating the "V" for the 3dc cluster that you will make in the next row}. Let me know if this clears your question up. If not, I will try to explain it more :) Thanks!
Hi Jessica.So happy to find your blog on Pinterest. I so heart this project so I included it on my round-up post about sewing projects you can make for your daughters. You can see the post here, http://sewingmadesimple.net/15-sewn-valentines-gifts-your-special-little-girl-will-love/
ReplyDeletePlease let me know if I missed something about your blog and do let me know if you want to change or add anything.
Xoxo,
Amber
P.s. I’m a new fan ;)
Hi Amber,
DeleteWhat a great round up! Thanks so much for including me! I'm so glad you found your way to my blog 😀
Jessica
I think these are adorable. Thank you for the pattern. Just curious if you have any idea how many inches for each pattern for each size depending on whether or not you use one band or two and how many more inches per inch added for say like a 17" head or a 22" head, etc. Unfortunately I don't have the heads near by for measuring as I crochet. Thanks in advance...Joyce
ReplyDeleteHi Joyce,
DeleteI haven't made these in bigger sizes so I do not know how many inches you would add. The hair ties give it a little stretch. So, what I would do is, make the entire headband, including the hair ties, an inch or two smaller than the head circumference. If you do not use any hair ties, you can make the headband the same circumference as the head you are making it for. Hope that helps. If you have nay other questions, let me know and I will try to help :) Thanks!
Such a fast and easy project! Thank you.
Delete